For customers who have no experience of image editing, we offer automatic image enhancement. This option allows us to ensure that each image is processed optimally to achieve the best possible result.
For customers who prefer to edit their own images (e.g. in Photoshop or Lightroom), or who already have some experience of image editing, we offer tips and tricks to help you achieve the perfect result.
In addition to the following tips, we also recommend our Sample Set, which contains all the materials and finishes available.
The following points should be considered when preparing images:
To judge colours correctly, it is important that both the lighting and the monitor are set up correctly. Find out all you need to know about colour management here.
It is important that the correct colour profiles are embedded in the images and delivered in RGB. We have provided a list of the colour profiles we accept.
Before producing an image, check that the contrast and brightness values are correct. Note that the images on the monitor are backlit and the photo product is not, so there may be a slight difference in brightness. If the monitor is not calibrated correctly, the image may appear too bright or too dark.
We recommend that you check the tonal values in the image. You can use the Tone Correction function to determine whether brightness is present in all areas of the image.
If highlights or shadows are missing, the product will later look dull and lack contrast. Here is an example of where highlights or shadows are missing. In these cases, we recommend that you rework the images.
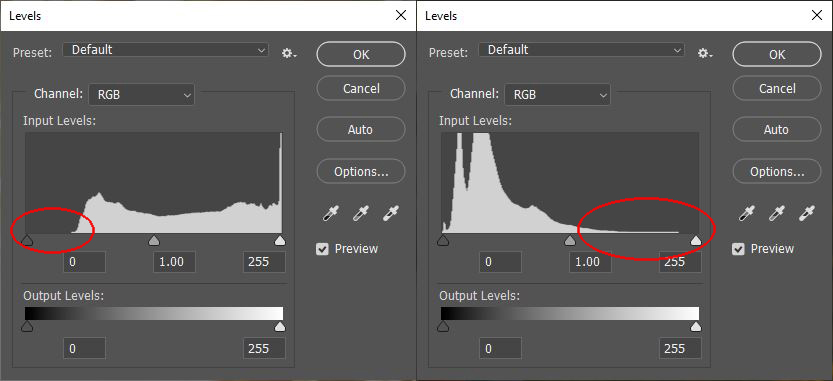
The picture is generally too dark and lacks highlights:The tonal values are only preserved in the mid to low tones and the picture appears very dark and lacking in contrast.
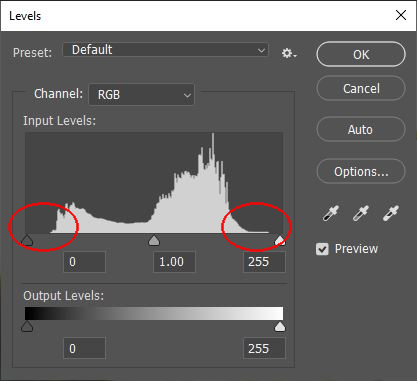
For best results, tonal values should be well distributed and present in all areas:

Images should have the correct production resolution. You can find this information with each product in the Professional Area. Make sure the dimensions and resolution are correct.
There are two main options. You can either manually resize the images in your programmes, in which case we recommend that you resharpen the images, or you can submit the image in its existing resolution and we will take care of this process.
There are several tools and options for sharpening images. If you are going to upscale the images, we recommend that you sharpen them. However, please ensure that the images are not over-sharpened, otherwise there is a risk of moiré in the production.
Lightroom: You can adjust the sharpness of your images during the development process. When exporting pictures, there is an option called Output Sharpness. This option should be unchecked if sharpness has already been set.
Moiré can be caused by oversharpening the image or by superimposing different halftone screens. Moiré can occur when an image is photographed, scanned, retouched or exposed/printed.
Moiré can be seen as a strong noise when the image is viewed at high magnification (at least 100%). For a photo product on real photo paper, we use a pixel imagesetter, which reproduces the individual pixels very sharply, so that all the image details are clear and this effect can be further enhanced during production.

To reduce or eliminate this effect, we recommend blurring the image in the affected areas.
Make a selective selection or mask on the affected areas. Then apply the Gaussian blur filter in Photoshop, for example. Unfortunately, we cannot give you a general guideline for the settings, as it depends entirely on your image, the size of the image and the strength of the moiré. After blurring, the image should have a homogeneous surface at high magnification (zoom in until you can see individual pixels).

Once the image has been processed, it is possible to simulate the final printed result using a soft proof. We provide our ICC profiles for this purpose.
Finally, you will need to save the image to send it to us. Here is a summary of the file formats we accept.
If you have edited your images yourself, please disable automatic image enhancement during the order process. Please also make sure that image enhancement is automatically disabled when you upload your images. If image enhancement is disabled, we will not make any changes to your image.
Professional photographers receive exclusive discounts, sample product advantages, and a dedicated shop and gallery system — all in one professional account.

Get exclusive discounts and designing tips! By signing up, you acknowledge our Privacy Policy. You can unsubscribe at any moment.


