Here you will find information on how to set up a soft proof in Lightroom and Photoshop. We also give you tips on whether you can also use the soft proof in other programs.
First, you must download the corresponding profile for your product. You can find our ICC profiles here, in ZIP format. Once you have downloaded the file, unzip it and import the profile:
macOS: Copy the profile into the Library > ColorSync > Profiles folder
Windows: Right-click the profile and select Install Profile
Under no circumstances should the profile be embedded in the file. Image data must be sent to us in RGB, regardless of which product you have chosen.
Soft proof is available for RGB profiles. Please note that CMYK profiles (such as Acrylic Glass, Metal Print, PVC Foam Board, Canvas, etc.) can only be used for soft proof in Photoshop.
In Lightroom, click on Develop in the menu bar and select the Soft Proofing checkbox. The background will turn white, indicating that you are in soft proofing mode. You can also see Proof Preview in the top right corner.


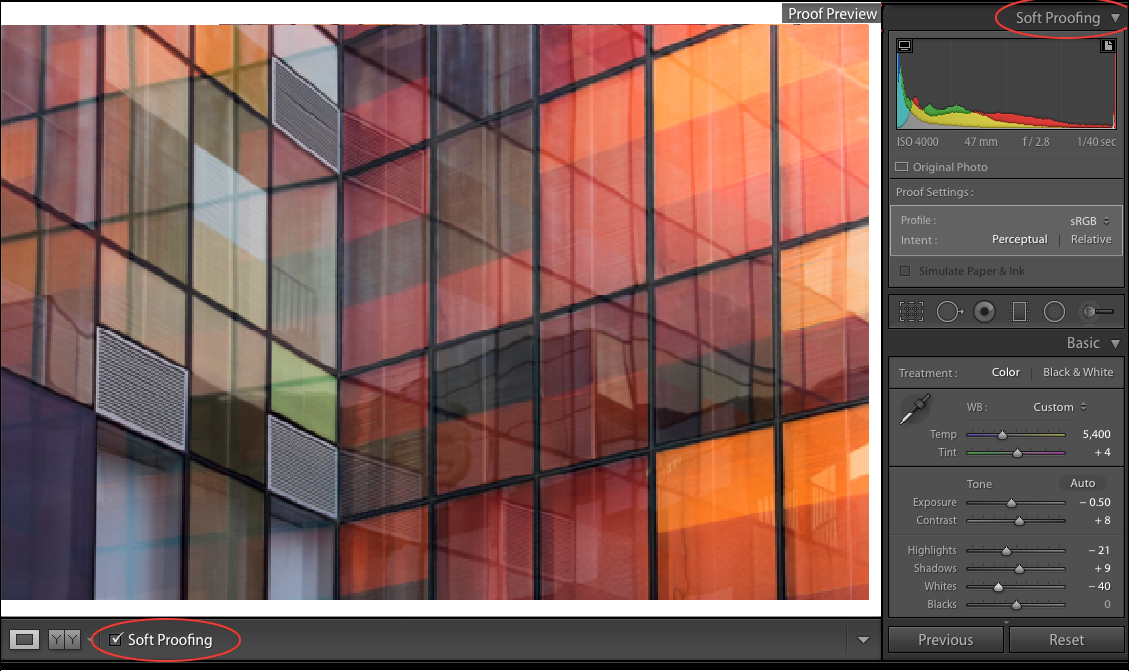
A Soft proofing menu will appear in the right column. Pull down the Profile menu and select Other. A window will open showing the ICC profiles installed. Check the box of the colour profile you want to use and press OK.
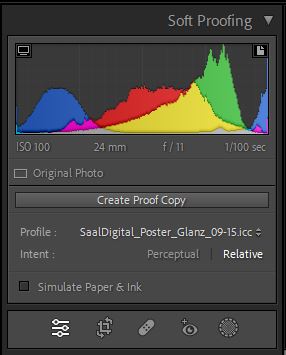
The profile field below the histogram will change to show the ICC profile that has just been added. The settings must be set according to the active ICC profile. You can check this on our ICC profiles page.
For example, the Glossy Poster ICC profile must have Intent set to relative and the Simulate Paper & Ink check box unchecked.
Once all the settings of the appropriate ICC profile have been set, and while the Soft Proofing check box is checked, the photo will be displayed according to the colour of that profile. All adjustments to the photo should be made with soft Proofing enabled, as this will be the result of the final product.
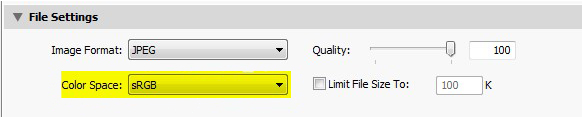
If your image is displayed correctly with the soft proof and looks the way you want it, you are now ready to export your image. Go to File > Export and enter your desired settings.
Please note that the file settings must be in an RGB colour space under colour space and that the SaalDigital profile should not be set!
Soft proof is available in Photoshop for RGB and CMYK profiles.
Import the image that you want to preview into Photoshop. To open the Soft proof dialogue, click on View button at the top menu and select Proof setup > Custom.
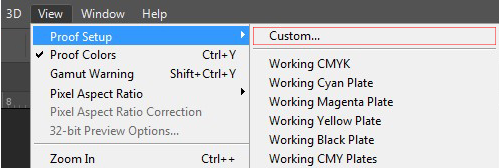
A Custom Proof Condition window will appear. Under Device to simulate, select the ICC profile you have downloaded and want to test. The other settings need to be filled in according to the needs of each profile. These can be checked on our ICC profiles page.
For example, the FineArt Baryta ICC profile must have Preserve RGB Numbers unchecked, Rendering Intent set to Relative Colorimetric, Black Point Compensation checked, and Simulate Paper Colour unchecked.

Click Save to save the added profile with all parameters filled in. Click OK when you are finished. The active colour profile in Photoshop is now the one you have just added.
The image will be displayed according to the colour settings of this installed profile, and it would be the result of the final product. All adjustments must be made with the ICC profile activated as a soft proof.
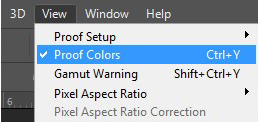
Through the option View > Proof Colours, you can now view the image with or without the profile. Alternatively, you can activate or deactivate the profile through the shortcut Ctrl + Y (Windows) or Cmd + Y (macOS).
Please note that the profiles for some of our products such as Wall Art and Cards, are CMYK, which will only be simulated. You will need to send us your images in RGB.
If you are satisfied with the colours of your images, save them and they are ready for printing. You can use them in our Saal Design software or Online shop.
In general, we recommend using Lightroom and Photoshop for soft proofing. In some cases, the settings required for the most accurate colour reproduction cannot be made in other programs.
Our ICC profiles can be selected after installation via View > Proof display for profile. However, other important settings, such as render priority, Black Point Compensation or paper colour simulation, can unfortunately not be made for the respective ICC profile. Therefore, we do not recommend using Capture One’s soft proofing function for our workflow. Without the necessary settings, colour accuracy cannot be guaranteed.
After installation, our ICC profiles can be selected as Proofing Profile via Adjustment > Softproof. The image will then appear in the soft proof. Although Render Intent and Black Point Compensation can be set, the Simulate Paper Colour function is missing.
Unfortunately, the soft proof function is not available.

Professional photographers receive exclusive discounts, sample product advantages, and a dedicated shop and gallery system — all in one professional account.

Get exclusive discounts and designing tips! By signing up, you acknowledge our Privacy Policy. You can unsubscribe at any moment.


